Junk replacement parts will be the death of me.


Junk replacement parts will be the death of me.
I have recently had multiple OEM parts that have not worked or are broken out the box. Particularly keyless access units or multiplex units. I was doing a clutch rebuild about a month ago and had the out and opened up and I pulled the new clutch plate out wouldn't you know it? It was cracked and looked like someone hit it with a hammer.Go ahead and add "Precision Fuel Pumps" to the list of things to not buy, ever, along with reman'd power steering pumps, and "power stop" brake parts.
Junk replacement parts will be the death of me.
That's a low labor rate for my area. We are about 190hr now and that's absolutely insane since I get paid about 20% of that. I wonder where the money goes sometimes. Because it sure does not go into our shop equipment.I just ordered the parts that Mrs SP needs to service her car.
100 dollars more or less all in plus an hour or so of my time, since obvious she won't be climbing under the car herself.
Either way, with mechanics labour rates here at least being 150dollars an hour, you can see the economics of how this saves money.
The only thing you have to have is a spare morning to do it, which I will have in the autumn before it gets too crazy for the next 6 months.
Depends on how you value your time I guess but I get a great deal of satisfaction from doing practical things like this.


That sucks. Happens so often huh, you just think you're on top of a job and then something goes wrong.Discovered that my exhaust manifold was cracked, I don't like exhaust leaks so I went to replace the manifold.
View attachment 12717
All was going well. The nuts and bolts holding the manifolds on all came out without any trouble.
View attachment 12718
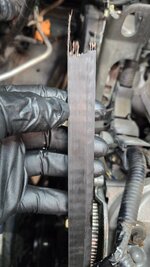
Thought I was in the clear, until it came time to torque down the very last one, the exhaust manifold stud on the far side of the engine, right up against the firewall, snapped. I was tightening it with a wrench, and it just wasn't tightening. Didn't even take much force, it just snapped off. Brittle from decades of heat cycles I suppose.
View attachment 12719
Unfortunately the remainder of the stud is recessed inside the head, so welding a bolt on there to get it off is not an option. Clearance is very limited back there against a the firewall. A regular drill won't fit back there. I do however have a compact cordless impact driver with 1/4" shank, so my plan is to use that with a stubby drill bit to drill a hole into the broken stud so I can get an easy out (bolt extractor) in there to get that broken stud out....
View attachment 12720
Hopefully the cobalt bits I ordered and my Ryobi bolt extractors are up to the task. I guess the main concern is breaking off a bolt extractor inside the stud.
@Gazeebo Any tips on completing a successful bolt extraction are greatly appreciated. Haven't has much luck with them in the past but this is a must-do.
I would start by blowing out the hole with some compressed air (cover the manifold or shield it somehow) and inspect the situation. From what I'm seeing the bolt in your hand is not sheered in an awkward way but it's best to see the stuck portion inside to verify.@Gazeebo Any tips on completing a successful bolt extraction are greatly appreciated. Haven't has much luck with them in the past but this is a must-do.
"Its gonna be, alright."
")


Looks like you have some camber issues which has caused your tires to wear prematurely. Not sure what vehicle you drive but your struts may be wearing out or leaking which can cause camber to degrade and cause such issues. Do you feel like your bouncing sometimes instead of a smooth ride? Do you rotate your tires every oil change? If it's rear wheel drive vehicle I would cross rotate them to even our their longevity.Took the tyres off to change to winters and have found that the geometry is out. I think maybe you guys call this tracking in english. Brand new set of tyres in April and now the fronts look like this.
View attachment 12794
I type this from their waiting room where they are fixing it. Photo bomb of Italian penny loafers you can have for free.
I remember my first beer.Indeed.
I was able to drill a nice hole in the center of the stud, and I was able to get an extractor bit to bite, so well, in fact, that the extractor head broke off in the hole.
After many curse words and other failed attempts at extraction using a welder, I threw in the towel and just sprayed the new gasket with permatex copper spray to help it seal and reinstalled the manifolds sans the one broken stud on the end.
Upon starting and running the engine, I was expecting to hear loud ticking from an exhaust leaks, but no such noises are present. If anything it's a bit quieter than before. I just hear the normal fuel injector and valvetrain noise. Maybe I got lucky and the remaining bolts provided enough clamping force on the gasket to seal it up. The flange that sits against the head is thick steel...

Yes, getting there. It's better now but still not right. I'll be taking it back there next week for them to look at all of the joints etc.Looks like you have some camber issues which has caused your tires to wear prematurely. Not sure what vehicle you drive but your struts may be wearing out or leaking which can cause camber to degrade and cause such issues. Do you feel like your bouncing sometimes instead of a smooth ride? Do you rotate your tires every oil change? If it's rear wheel drive vehicle I would cross rotate them to even our their longevity.
What I mean by that is. Driver rear goes passenger front. Pass rear goes drive front and front tires just go strait back no crossing.
If you live in a rough road area I would align around 10k miles (every 15-16k km).

Good project! I've done this twice, and it made a real improvent.The old heep has 250,000 miles now, still running, still being driven regularly. However, lately I've noticed it has a decent amount of blow-by, and is a little down on power and MPGs, so I want to breathe some life into the tired engine. This will be my first time doing major internal engine work.
I thought about just buying a remanufactured long block, but those are expensive and where's the fun in that?
Instead, I'm going to do an old school in-frame refresh. Pull the head, drop the oil pan, hone the cylinders, clean and inspect pistons, and install new rings. With the head off I can finally take care of that broken exhaust stud, lap the valves the old school way with some lapping compound, install new valve seals, inspect the lifters, pushrods, rocker arms, all that stuff.
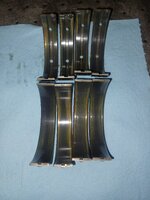
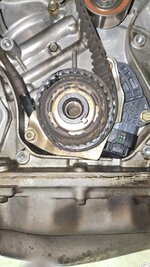
I plan on reusing everything that is still in serviceable condition to keep costs down. Since I won't be pulling the block, the original camshaft is staying in, can't get it out without pulling the block. The main question is what should be done with the bottom end. I wont be using a machine shop. With the oil pan off I have access to the bearings. These engines have seven main bearings supporting the crank, they get oiled first, and they rarely ever go bad. I pulled one main bearing cap when I replaced the rear main seal a couple years ago and the bearing looked fine to my eyes, no copper showing:
View attachment 18849
So with the main bearings likely being perfectly fine, and the fact that I wont be pulling the crank to have it machined, I'm thinking leaving them alone is probably the best move. Rod bearings, I'm not as sure about. The rod bearings are probably more likely to wear out, so I'm leaning toward replacing them. I'll also toss in a new oil pump while I'm down there.
Was the scoring (which is visible in your picture on the bearing surface) able to be felt when scraping a fingernail over it laterally?The old heep has 250,000 miles now, still running, still being driven regularly. However, lately I've noticed it has a decent amount of blow-by, and is a little down on power and MPGs, so I want to breathe some life into the tired engine. This will be my first time doing major internal engine work.
I thought about just buying a remanufactured long block, but those are expensive and where's the fun in that?
Instead, I'm going to do an old school in-frame refresh. Pull the head, drop the oil pan, hone the cylinders, clean and inspect pistons, and install new rings. With the head off I can finally take care of that broken exhaust stud, lap the valves the old school way with some lapping compound, install new valve seals, inspect the lifters, pushrods, rocker arms, all that stuff.
I plan on reusing everything that is still in serviceable condition to keep costs down. Since I won't be pulling the block, the original camshaft is staying in, can't get it out without pulling the block. The main question is what should be done with the bottom end. I wont be using a machine shop. With the oil pan off I have access to the bearings. These engines have seven main bearings supporting the crank, they get oiled first, and they rarely ever go bad. I pulled one main bearing cap when I replaced the rear main seal a couple years ago and the bearing looked fine to my eyes, no copper showing:
View attachment 18849
So with the main bearings likely being perfectly fine, and the fact that I wont be pulling the crank to have it machined, I'm thinking leaving them alone is probably the best move. Rod bearings, I'm not as sure about. The rod bearings are probably more likely to wear out, so I'm leaning toward replacing them. I'll also toss in a new oil pump while I'm down there.
Was the scoring (which is visible in your picture on the bearing surface) able to be felt when scraping a fingernail over it laterally?
If so, I'd be replacing those bearings for sure.
If not, and you're okay with it possibly being an issue down the line, I might consider skipping it.. but I'm autistic so I'd probably replace them anyway.
On a related note, I would also give the corresponding crankshaft journal bearing surface the fingernail scape test. Those scoring marks came from somewhere.
The rule as I understand it is as follows:
If you can feel it with your nail, replace it.
If not, thoroughly clean and very lightly polish it.
However my personal rule would probably be if I'm already in there, and there is any signs of wear, it's getting replaced anyway.
Good luck! I am looking forward to hearing how it goes.
 .
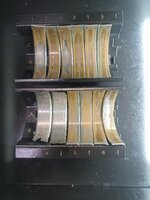
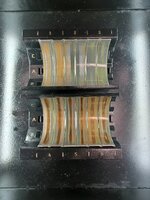
.My man that's a clean main bearing for 250k. Some would say it's still new. Here are some example of connecting rod bearing and main bearings that are smoked. You can see the deamination od then bearings in the first photo and the scoring on the second photo. We have pulled bearing out of these engines that are so thin the will snap under light pressure. If you replace the rod bearings look at your crank there should be a code on it (probably on first counterweight by crank pulley) take a photo of it is your journal codes you will need it for your con rod bearings.The old heep has 250,000 miles now, still running, still being driven regularly. However, lately I've noticed it has a decent amount of blow-by, and is a little down on power and MPGs, so I want to breathe some life into the tired engine. This will be my first time doing major internal engine work.
I thought about just buying a remanufactured long block, but those are expensive and where's the fun in that?
Instead, I'm going to do an old school in-frame refresh. Pull the head, drop the oil pan, hone the cylinders, clean and inspect pistons, and install new rings. With the head off I can finally take care of that broken exhaust stud, lap the valves the old school way with some lapping compound, install new valve seals, inspect the lifters, pushrods, rocker arms, all that stuff.
I plan on reusing everything that is still in serviceable condition to keep costs down. Since I won't be pulling the block, the original camshaft is staying in, can't get it out without pulling the block. The main question is what should be done with the bottom end. I wont be using a machine shop. With the oil pan off I have access to the bearings. These engines have seven main bearings supporting the crank, they get oiled first, and they rarely ever go bad. I pulled one main bearing cap when I replaced the rear main seal a couple years ago and the bearing looked fine to my eyes, no copper showing:
View attachment 18849
So with the main bearings likely being perfectly fine, and the fact that I wont be pulling the crank to have it machined, I'm thinking leaving them alone is probably the best move. Rod bearings, I'm not as sure about. The rod bearings are probably more likely to wear out, so I'm leaning toward replacing them. I'll also toss in a new oil pump while I'm down there.