Just gaskets, rings, and valve job will do wonders.Just wait until he hears I'm planning on reusing the head bolts.
Ring set, rod bearings, high volume oil pump, and master gasket/seal kit was about $200 including shipping.
It's already driven to the moon, let's see if this $200 engine refresh can get it back to Earth.

You are using an out of date browser. It may not display this or other websites correctly.
You should upgrade or use an alternative browser.
You should upgrade or use an alternative browser.
DIY Car Maintenance
- Thread starter mountainaire
- Start date
Yeah, everything I've read and heard indicates that the mains last forever in these engines. Makes sense when you think about it, there's seven main bearings, 3 more than a V8, that's a lot of bearing surface in an engine making not very much power.My man that's a clean main bearing for 250k. Some would say it's still new. Here are some example of connecting rod bearing and main bearings that are smoked. You can see the deamination od then bearings in the first photo and the scoring on the second photo. We have pulled bearing out of these engines that are so thin the will snap under light pressure. If you replace the rod bearings look at your crank there should be a code on it (probably on first counterweight by crank pulley) take a photo of it is your journal codes you will need it for your con rod bearings.
I believe you could get away with reusing your oil pump long as there is no sludge in it. Just blast brake cleaner into it for let it sit for a while. And as always take your time and good luck I know you can do it.
Make sure you leave those head bolts in from the time you remove them to the time you install them. I would recommend an angle torque wrench but it's not necessary.
Rings and rod bearings showed up today. Old school cast iron 5/64". For the rod bearings I didn't look at any journal codes, I just went with standard size replacements. I made sure to get tri-metal bearings instead of the aluminum ones they're trying to push now.


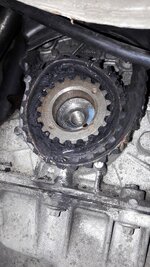
Since no one here is yet tired of me talking about my love for Honda ill tell yall a recently story that happened to me. I was picking my daughter up from school and my 05 pilot died coming to a stop. Could not start it or anything. Towed it to work and found the timing belt broke and wrapped around the crankshaft cog. We'll the biggest fear was that since they are interference motors that a valve bent and I would have to replace a head or more. I was able to pry off the cog and belt and re time the cams. Put a new belt on and would you believe it she ran no valves bent. The J series is a monster that has to be massively abused before it fails.
Had a late 90s Honda Passport and this exact thing happened to me.
I would recommend looking at your crankshaft codes before you install those bearings. From the amounts of bearing I've replaced there are 5 different color codes that differentiate In sizes ranging from blank to pink. I don't speak for jeep but the sizes do matter at the end of the day.Yeah, everything I've read and heard indicates that the mains last forever in these engines. Makes sense when you think about it, there's seven main bearings, 3 more than a V8, that's a lot of bearing surface in an engine making not very much power.
Rings and rod bearings showed up today. Old school cast iron 5/64". For the rod bearings I didn't look at any journal codes, I just went with standard size replacements. I made sure to get tri-metal bearings instead of the aluminum ones they're trying to push now.
View attachment 18968
View attachment 18969
If your crank has thrust bearing i always use a ditty from Ace Ventura "laces out".
The Honda passport from the 90s is a Frankenstein. Everything is Isuzu besides the engine and transmission. I hope you were able to fix your issue I was.Had a late 90s Honda Passport and this exact thing happened to me.
Good to know. After some more research it does seem that some engines were shipped with 0.001 undersized bearings due to manufacturing variances in crank machining.I would recommend looking at your crankshaft codes before you install those bearings. From the amounts of bearing I've replaced there are 5 different color codes that differentiate In sizes ranging from blank to pink. I don't speak for jeep but the sizes do matter at the end of the day.
If your crank has thrust bearing i always use a ditty from Ace Ventura "laces out".
I'll look for that journal code and verify the sizing on the backing of the old bearings to make sure before installing the new ones. Hopefully I'm lucky and they're all standard so I don't have to re-order.
Pulled the plugs and did a pre-teardown compression test:

These are encouraging results. Optimal cylinder compression specs for this engine are between 120 and 150 psi. We're obviously at the bottom end of that with a few cylinders being out of that optimal range, but there are no "dead cylinders", so that tells me there's no catastrophic damage. I'm hoping the valve lapping, cylinder hone and re-ring job should give a nice bump up to get them well into the healthy range.
These are encouraging results. Optimal cylinder compression specs for this engine are between 120 and 150 psi. We're obviously at the bottom end of that with a few cylinders being out of that optimal range, but there are no "dead cylinders", so that tells me there's no catastrophic damage. I'm hoping the valve lapping, cylinder hone and re-ring job should give a nice bump up to get them well into the healthy range.
You should hopefully see over 140 on each after your rebuild. That will give a nice boost in performance!Pulled the plugs and did a pre-teardown compression test:
View attachment 19183
These are encouraging results. Optimal cylinder compression specs for this engine are between 120 and 150 psi. We're obviously at the bottom end of that with a few cylinders being out of that optimal range, but there are no "dead cylinders", so that tells me there's no catastrophic damage. I'm hoping the valve lapping, cylinder hone and re-ring job should give a nice bump up to get them well into the healthy range.
That happened to me, the belt wrapped around the crank sprocket so hard I ran a high chance of breaking the aluminum housing. Pulling that out was a feat in itself.Since no one here is yet tired of me talking about my love for Honda ill tell yall a recently story that happened to me. I was picking my daughter up from school and my 05 pilot died coming to a stop. Could not start it or anything. Towed it to work and found the timing belt broke and wrapped around the crankshaft cog. We'll the biggest fear was that since they are interference motors that a valve bent and I would have to replace a head or more. I was able to pry off the cog and belt and re time the cams. Put a new belt on and would you believe it she ran no valves bent. The J series is a monster that has to be massively abused before it fails.
Attachments
Got the head off. No cracks that I can see, but it's still very dirty. This was one of the more durable head castings for this engine, #7120. I noticed that the intake valves are a lighter shade in a couple of cylinders.

Here is the carnage left over from my failed exhaust stud extraction. Pretty gnarly. As you can see it was leaking around that port. I plan on smoothing that area out, cleaning out the hole with carbide bits, using a helicoil insert to repair the threads. Have to be careful here, but should be totally doable with the head off. If tapping for the helicoil doesn't work out, I will braze in a new stud.

The cylinder walls look better than expected. Visible cross hatching remains in all of the cylinders, some very very minor vertical scoring is present but you can't even feel it with your fingers. Should take to a fresh hone nicely I'm thinking.

Here is the carnage left over from my failed exhaust stud extraction. Pretty gnarly. As you can see it was leaking around that port. I plan on smoothing that area out, cleaning out the hole with carbide bits, using a helicoil insert to repair the threads. Have to be careful here, but should be totally doable with the head off. If tapping for the helicoil doesn't work out, I will braze in a new stud.
The cylinder walls look better than expected. Visible cross hatching remains in all of the cylinders, some very very minor vertical scoring is present but you can't even feel it with your fingers. Should take to a fresh hone nicely I'm thinking.
Last edited:
Isn't that just the difference from temperature?I noticed that the intake valves are a lighter shade in a couple of cylinders.
Yeah was thinking maybe those cylinders were running a bit lean.Isn't that just the difference from temperature?
It's not just the cylinders, intake valves may run at a lower temp as they are cooled with intake air.Yeah was thinking maybe those cylinders were running a bit lean.
Got that sucker out. Had to slowly eat away at it with carbide burrs, then finally a screw extractor got it out without breaking. I won't even need to helicoil it, as there's plenty of remaining threads still intact in the hole.

Head work is finished. Cleaned it up, lapped each valve and installed new valve seals. This was more time consuming than I had anticipated. Not a single crack in this head casting that I can see. Got to love that old iron. Yeah I need better lighting in the garage. My shop light lens shattered after weld spatter landed on it.

Made my own valve lapping tool with a section of hose and some clamps.

The intake valves all took to the lapping nicely, with a nice dull grey ring where they seat. Some of the exhaust valves were quite pitted, and the lapping compound didn't remove all of the pitting, but I imagine it still made a nice improvement in the seal.


Did a leak down test afterwards, where I sprayed a pool of carb cleaner into all on the ports, let it sit for a little bit, and found no leaks, so I'm thinking we're good to go.
Made my own valve lapping tool with a section of hose and some clamps.
The intake valves all took to the lapping nicely, with a nice dull grey ring where they seat. Some of the exhaust valves were quite pitted, and the lapping compound didn't remove all of the pitting, but I imagine it still made a nice improvement in the seal.
Did a leak down test afterwards, where I sprayed a pool of carb cleaner into all on the ports, let it sit for a little bit, and found no leaks, so I'm thinking we're good to go.
Last edited:
Oh yeah, we're gonna need some rod bearings. The good news is the pistons are all solid, not a single stuck ring on any of them, no broken skirts or cracks, and the wrist pins all seem to be tight.
These pistons were the old design leftover from the AMC days. Starting in 1996, Chrysler used a lighter piston for these engines, and they all end up cracking and breaking piston skirts once they get some serious mileage on them. These older style pistons wear the rod bearings more but can take a serious beating.


These pistons were the old design leftover from the AMC days. Starting in 1996, Chrysler used a lighter piston for these engines, and they all end up cracking and breaking piston skirts once they get some serious mileage on them. These older style pistons wear the rod bearings more but can take a serious beating.
Last edited:
Best I could do with the tools that I have. Looks better in person than in the photo.

I've seen bearings at 30k look the same so yes those bearings did their job well for long time. Nice work a true DIYer you are.Oh yeah, we're gonna need some rod bearings. The good news is the pistons are all solid, not a single stuck ring on any of them, no broken skirts or cracks, and the wrist pins all seem to be tight.
These pistons were the old design leftover from the AMC days. Starting in 1996, Chrysler used a lighter piston for these engines, and they all end up cracking and breaking piston skirts once they get some serious mileage on them. These older style pistons wear the rod bearings more but can take a serious beating.
View attachment 19302
View attachment 19303
After much procrastinating I was able to get the Ole Pilot back on its feet. The best cause I can find was the tensioner failed and make the belt jump off the tensioner pulley and get gobbled up by the crank cog. While i was in there I also resealed the oil pump again and performed a valve adjustment. Nothing seemed wrong in the heads at the valves hardly needed adjusting.
Attachments
Nice! I feel like I'm vicariously doing a rebuild from following this project. Now I want to insert the pistons, mount and torque down the head, assemble the piston bearings to the crank and torque them down, etc. I can't wait to fire it up for the first time! Weird that it's hitting me like this.Best I could do with the tools that I have. Looks better in person than in the photo.
View attachment 19358
I think I'll get busy and do some kind of project on my truck.