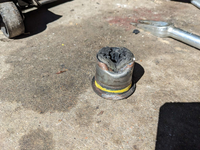
You could leave gas cap off and out a funnel down the tube to get fumes out. Might save you from explosions. When you say no threads why not tap some into the holes?The ones that weren't optioned with the skids from the factory just had blank holes with no threaded nut-serts, so I had to burn in some weld-on m10 nuts.
View attachment 6901
View attachment 6902
View attachment 6903
The gas tank skid will be a bit trickier, due to clearance issues. Welding in tight areas is very difficult when you can't get good angles on whatever you're welding, not to mention it's right next to the gas tank, hopefully there will be no explosions in my future.
You are using an out of date browser. It may not display this or other websites correctly.
You should upgrade or use an alternative browser.
You should upgrade or use an alternative browser.
DIY Car Maintenance
- Thread starter mountainaire
- Start date
Here at Stupid Auto LLC we have our own way of doing things. Should I drop the tank for safety? Nah, I'll just stick a piece of cardboard up there to deflect the sparks, and send it. It's the Stupid way.You could leave gas cap off and out a funnel down the tube to get fumes out. Might save you from explosions. When you say no threads why not tap some into the holes?

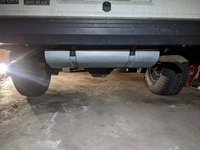
It's been a fun journey. I'm definitely not some kind of master mechanic or anything like that, but I believe that the layman can do most things to a reasonable standard with a little bit of time and effort.
View attachment 7102
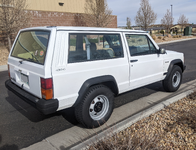
I'm not familiar with American cars at all but I'm so happy to see this is a two door.
Not sure if this is rare or not, but this seems like such a great option. Seems like so much more room without the hassle of rear seats and obvious trunk space. Is this what you wanted originally?
Here in New Zealand that's quite common to find a single cab ute we call it (2 door 4wd). Very basic chassis and strong enough tray on the back. Toyota are the best for this. (4 door not really needed depending on daily passengers)
Paint looks great. Excellent effort, regardless.
Thanks man. Yeah the 2 door config was another motivation for fixing it up. Don't see many of them around anymore. The vast majority were 4 doors. Many of them were destroyed over the years. Turned into rock crawling buggys, wrecked, junked, etc.I'm not familiar with American cars at all but I'm so happy to see this is a two door.
Not sure if this is rare or not, but this seems like such a great option. Seems like so much more room without the hassle of rear seats and obvious trunk space. Is this what you wanted originally?
Here in New Zealand that's quite common to find a single cab ute we call it (2 door 4wd). Very basic chassis and strong enough tray on the back. Toyota are the best for this. (4 door not really needed depending on daily passengers)
Paint looks great. Excellent effort, regardless.
An advantage of white paint is that it's super easy work with and hides imperfections. Darker colors tend to show scratches and dents more.
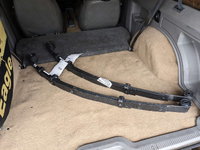
I suppose it'll never be over, or be "done". Although the list of things to do is much much smaller than before, the list remains and probably always will remain so long as it's being kept and driven. It's driving pretty nice now, want to tighten it up a little with a set of new motor/transmission mounts, and new leaf springs. The old leaf packs are tired and sag a bit just from a full tank of gas. Got a decent deal on these stock height replacements, "heavy duty" with a little extra load capacity. Should restore the positive rake and help handling a bit, firm it up some.

What do car parts, wars, and geopolitics have in common?
Last edited:
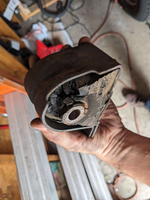
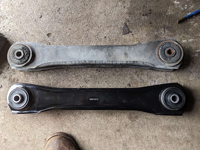
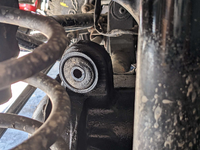
I was wondering about this. You did some great work on your Jeep's body, but then I was thinking about all the suspension parts that can be worn on an old Jeep, and make for a loose ride. Sounds like you're fixing all that too.Motor mounts and suspension bushings are something most people don't think about. They do wear out with age and use. They can cause your ride to clunk and lose that "tight" feeling that new vehicles have. They can be a huge PITA to replace, but are cheap and make a big difference.
View attachment 7968
View attachment 7967
View attachment 7969
View attachment 7970
When a mount goes bad it's hopefully evident however I've seen some vehicles with completely separated front and rear mounts. I have rarely seen side mounts go bad. I use a jack with a cut piece of 2x4 to lift the engine a bit so it does not hang and helps with lining up those pesky bolt holes.Motor mounts and suspension bushings are something most people don't think about. They do wear out with age and use. They can cause your ride to clunk and lose that "tight" feeling that new vehicles have. They can be a huge PITA to replace, but are cheap and make a big difference.
Good PSA as always @mountainaire
@Gazeebo You're a mechanic right?
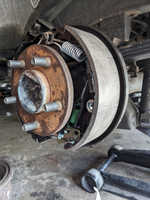
My new drums, they stop well and can lock the rear wheels up easily, but make an ear piercing squeal when slowing to a stop. They are quiet during heavy braking, like rolling down a mountain pass, but squeal under light/moderate braking like slowing down approaching a stop sign.
I did make sure to lube the contact points on the backing plate. I may have adjusted the shoes too tightly initially. Sometimes I hear a ringing coming from the drums while driving.
Too much drag? How tight should they be exactly? I've read conflicting opinions.
When jacked up try to spin the wheel. It should spin freely without any resistance. If so, adjust accordingly.@Gazeebo You're a mechanic right?
My new drums, they stop well and can lock the rear wheels up easily, but make an ear piercing squeal when slowing to a stop. They are quiet during heavy braking, like rolling down a mountain pass, but squeal under light/moderate braking like slowing down approaching a stop sign.
I did make sure to lube the contact points on the backing plate. I may have adjusted the shoes too tightly initially. Sometimes I hear a ringing coming from the drums while driving.
Too much drag? How tight should they be exactly? I've read conflicting opinions.
I would start by seeing if I can isolate it to one side while driving.@Gazeebo You're a mechanic right?
My new drums, they stop well and can lock the rear wheels up easily, but make an ear piercing squeal when slowing to a stop. They are quiet during heavy braking, like rolling down a mountain pass, but squeal under light/moderate braking like slowing down approaching a stop sign.
I did make sure to lube the contact points on the backing plate. I may have adjusted the shoes too tightly initially. Sometimes I hear a ringing coming from the drums while driving.
Too much drag? How tight should they be exactly? I've read conflicting opinions.
If you cannot isolate it lift the back end up and spin both wheels. If one is slowing down faster than the other then that one is probably your issue and I would readjust the tension accordingly.
If they are both the relative same speed I would get the rotors off and check my work and re-adjust both sides and retest.
You do want a little resistance but not alot.
There are service ports on the back of any drum brake that allow you to tighten but are a bit of a pain to loosen that way.
I would also if you didn't clean the inside of your rotor with a die grinder and a wire wheel. This will remove any rust and brake dust caked inside to allow optimal contact with your new brake shoes.
Any mechanics, backyard or pro, got some advice for me?
Brake squeak on my 2012 Accord. It's been ongoing for awhile. I recently replaced the rear rotors, calipers and pads after noticing the right side pads were worn to the bone and the left was about 40%. Squeak persisted so I did some homework and thought that the flex hose could be the culprit. As I understood, the flex hose can collapse internally and act as a sort of check valve, i.e. fluid flows in to the caliper under pressure but is unable to adequately flow back out when the pedal is released resulting in the caliper hanging up. After replacing the hose I did a thorough flush and bleed, took a drive to run some errands and the squeak came back! The squeak occurs briefly when I apply the brakes after driving at speed for awhile, but otherwise the brakes feel normal.
Edit to add: I replaced the front brakes about a year ago and the squeak was present both before and after replacement. Front pad wear is even with good life left. It definitely sounds like the squeak is coming from the right rear when I drive with the windows down.
Last edited:
Any mechanics, backyard or pro, got some advice for me?
Brake squeak on my 2012 Accord. It's been ongoing for awhile. I recently replaced the rear rotors, calipers and pads after noticing the right side pads were worn to the bone and the left was about 40%. Squeak persisted so I did some homework and thought that the flex hose could be the culprit. As I understood, the flex hose can collapse internally and act as a sort of check valve, i.e. fluid flows in to the caliper under pressure but is unable to adequately flow back out when the pedal is released resulting in the caliper hanging up. After replacing the hose I did a thorough flush and bleed, took a drive to run some errands and the squeak came back! The squeak occurs briefly when I apply the brakes after driving at speed for awhile, but otherwise the brakes feel normal.
Edit to add: I replaced the front brakes about a year ago and the squeak was present both before and after replacement. Front pad wear is even with good life left. It definitely sounds like the squeak is coming from the right rear when I drive with the windows down.
Are you doing this work DIY?
Did you use OEM parts?
If yes, I would ask you, did you use some sort of moly coat (brake squeal lubricant)?
Did you apply it to the ears on the pads and also lube the pins?
When you put new calipers on did you put new pad mounting brackets on?
If so, take a mirror and look to see if they are touching the rotor. You should be able to see if they are by looking through your wheels and where the openings are on the back of the caliper. I have seen before where under low braking moments (under 15mph) they will touch but after the force will push it out.
If they look like they might be just take the wheel off, use a pocket screw driver, push the brackets off the rotor. Leverage so the flat of Philips side is not going towards the rotor.
Did you spray off your new rotors with brake cleaner to remove the outer coat of protectant?
Those are some off the top of my head starts.
Yup, DIY in the driveway.Are you doing this work DIY?
Did you use OEM parts?
If yes, I would ask you, did you use some sort of moly coat (brake squeal lubricant)?
Did you apply it to the ears on the pads and also lube the pins?
When you put new calipers on did you put new pad mounting brackets on?
If so, take a mirror and look to see if they are touching the rotor. You should be able to see if they are by looking through your wheels and where the openings are on the back of the caliper. I have seen before where under low braking moments (under 15mph) they will touch but after the force will push it out.
If they look like they might be just take the wheel off, use a pocket screw driver, push the brackets off the rotor. Leverage so the flat of Philips side is not going towards the rotor.
Did you spray off your new rotors with brake cleaner to remove the outer coat of protectant?
Those are some off the top of my head starts.
Not OEM Honda, Rock Auto Parts, didn't totally cheap out, got the midgrade stuff.
Yup, greased the ears and pulled the pins from the new mounting brackets and lubed them up a little more than how they came, wiping off the excess.
All new components, including brackets and verified they weren't rubbing the rotors.
I did a light rub down of the new rotors with brake clean, but they weren't terribly slimy to begin with and have driven about 100 miles on them since so I suspect any goop would've burnt off by now anyway.
I'm at my wits end on this one. I strongly suspect that the right rear caliper still isn't fully releasing, either that or the 100 or so miles of driving with a potentially bum brake hose locking up the caliper cooked the new pads. I'll be taking a longer drive out to the GF's place tomorrow, about an 80 mile round trip, so I'll see how it behaves. Maybe I just have to wear off whatever burnt bits could be on the pads. Might try swapping out pads again too, they're cheap for this car.
Good on you for diy. Brakes are simple to do for most cars especially Honda/Acura.Yup, DIY in the driveway.
Not OEM Honda, Rock Auto Parts, didn't totally cheap out, got the midgrade stuff.
Yup, greased the ears and pulled the pins from the new mounting brackets and lubed them up a little more than how they came, wiping off the excess.
All new components, including brackets and verified they weren't rubbing the rotors.
I did a light rub down of the new rotors with brake clean, but they weren't terribly slimy to begin with and have driven about 100 miles on them since so I suspect any goop would've burnt off by now anyway.
I'm at my wits end on this one. I strongly suspect that the right rear caliper still isn't fully releasing, either that or the 100 or so miles of driving with a potentially bum brake hose locking up the caliper cooked the new pads. I'll be taking a longer drive out to the GF's place tomorrow, about an 80 mile round trip, so I'll see how it behaves. Maybe I just have to wear off whatever burnt bits could be on the pads. Might try swapping out pads again too, they're cheap for this car.
No vibrations? When you replaced the hose you did the rubber part right? Did you clamp the line? I won't try and remove pads and press rhe piston in with a proper tool (large adjustable jaw pliers work well) ensure you keep the old inner pad on as to not damage piston In caliper. Does it move? I find it bizzara new piston is sticking in a caliper I would like to see it so I could learn more. If when you replace caliper again get you a pair of hose clamps to ensure not air gets into system.
Redo bleed process and do all 4 start with passenger rear, driver rear, passenger front, then finally driver front. And retest. Is it possible you got a bad caliper from rockauto? Yes but unlikely.
Yup, DIY in the driveway.
Not OEM Honda, Rock Auto Parts, didn't totally cheap out, got the midgrade stuff.
Yup, greased the ears and pulled the pins from the new mounting brackets and lubed them up a little more than how they came, wiping off the excess.
All new components, including brackets and verified they weren't rubbing the rotors.
I did a light rub down of the new rotors with brake clean, but they weren't terribly slimy to begin with and have driven about 100 miles on them since so I suspect any goop would've burnt off by now anyway.
I'm at my wits end on this one. I strongly suspect that the right rear caliper still isn't fully releasing, either that or the 100 or so miles of driving with a potentially bum brake hose locking up the caliper cooked the new pads. I'll be taking a longer drive out to the GF's place tomorrow, about an 80 mile round trip, so I'll see how it behaves. Maybe I just have to wear off whatever burnt bits could be on the pads. Might try swapping out pads again too, they're cheap for this car.
I'm not a mechanic I can only speak from experience of the half banana jobs I've done myself in my warehouse, learning as I go. From my experience Japanese cars don't like non OEM parts and they especially don't like mass produced high defect rate general fit auto part store parts. It's not like American cars where the aftermarket stuff is usually better it's the opposite, they left the factory with better parts and the aftermarket stuff is trash in comparison.
Good on you for diy. Brakes are simple to do for most cars especially Honda/Acura.
No vibrations? When you replaced the hose you did the rubber part right? Did you clamp the line? I won't try and remove pads and press rhe piston in with a proper tool (large adjustable jaw pliers work well) ensure you keep the old inner pad on as to not damage piston In caliper. Does it move? I find it bizzara new piston is sticking in a caliper I would like to see it so I could learn more. If when you replace caliper again get you a pair of hose clamps to ensure not air gets into system.
Redo bleed process and do all 4 start with passenger rear, driver rear, passenger front, then finally driver front. And retest. Is it possible you got a bad caliper from rockauto? Yes but unlikely.
The thing is it squeaked before I did any work and still squeaks now. Finding the uneven wear lead me to believe the squeak was caused by one caliper sticking, but after replacing all rear components plus the flex hose on the offending wheel the squeak is still present and I'm not so sure. I've lived with the squeak for two years or so at this point so I suppose I'll monitor the pads and see if they continue to wear unevenly.
I'm not a mechanic I can only speak from experience of the half banana jobs I've done myself in my warehouse, learning as I go. From my experience Japanese cars don't like non OEM parts and they especially don't like mass produced high defect rate general fit auto part store parts. It's not like American cars where the aftermarket stuff is usually better it's the opposite, they left the factory with better parts and the aftermarket stuff is trash in comparison.
I've generally had good luck with mass market parts on my jap cars. I'll buy from the dealer for certain stuff, engine internals, certain gaskets, Honda's special tranny fluid because it's not the same as ATF, etc. But brakes I'm comfortable buying mass market. I bought the car at six years old so I'm not sure if what was on there was OEM, but the noise started about four years into my ownership and the uneven wear is only apparent now.
From here I'm just going to run it, see if I get uneven wear and go from there. There's a guy at my church who works for Honda training dealer technicians, I may pick his brain too if I can get a moment with him tomorrow. Thanks for all the insight, gentlemen!

